
While Microsoft Word already comes preinstalled with several dozen font styles to choose from, they can become a bore quite fast. This is especially true if you’re a regular Microsoft Word user and have routinely used these fonts in creating eBooks, reports, and all sorts of documents. If you’re tired of looking at the same old styles and want to switch things up a bit, you’ll be glad to know that adding new fonts to Microsoft Word is a straightforward and quick process to do.
But before doing so, you first need to have your font downloaded and ready on your computer. There are several great websites where you can find new fonts to match your personal style and needs. For instance, DaFont and Google Fonts have a varied selection that you can download at no cost. You might also want to try converting your handwriting into a custom font for a more personalized look. After downloading the style of your choice, you can proceed with adding it to Microsoft Word.
How to Install New Fonts in Microsoft Word on Windows
 To add a new font to Microsoft Word, or any of the other Microsoft Office apps, you need to install the font to your computer directly. If you’re on a Windows device, here’s what you need to do (via Microsoft Support):
- Open the font file you downloaded. This font file will usually be in TrueType (.ttf) or OpenType (.otf) format. If you downloaded a .zip file, simply extract it to access the font file.
- Select the Install button on the top-left corner of the screen.
- When prompted, click Yes to make changes to your computer.
- Launch Microsoft Word.
- Select Blank Document.
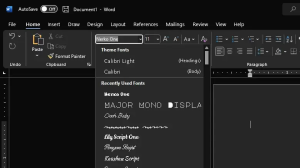
- Click on the font list in the ribbon.
- Search for the name of the font file to verify that it’s installed correctly.
You should immediately see the font on the list. If not, try restarting your computer and relaunching Microsoft Word.
How to Install New Fonts in Microsoft Word on Mac
 Similar to Windows, you need to install the new font to your Mac in order to use it in Microsoft Word. Here’s how to do so (via Apple Support):
- Double-click on the font file (.ttf or .otf) to open it.
- Select the Install Font button on the bottom-right corner of the window that appears.
- In the new window, drag the installed font to one of the folders under Collection.
- Close the window.
- Open Microsoft Word.
- Click on Blank Document.
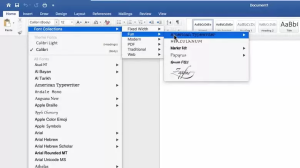
- Click on the font list in the top ribbon.
- To find your new font, choose Font Collection and the folder to which you added the new font. It should automatically be listed here.
If the font doesn’t appear in Word, close the app and restart your Mac, as some fonts need a reboot to finish installing. If this still doesn’t help, check whether your font is damaged by downloading and installing it on another device to see if it works there.
Marinel Sique, “Here’s How to Add New Fonts to Microsoft Word”, slashgear.com, Feb. 4, 2023