 If you’ve spent a few years with Windows 10, you’ve probably mastered the basic actions, which means you’re reasonably productive. But some of the most interesting productivity boosters are not immediately obvious. That’s especially true for new features that Microsoft adds as part of a feature update. If you’re not paying attention to the release notes, you might not notice the new stuff.
Below are five well-hidden Windows 10 features that will save you time and help you avoid unnecessary clicks.
SNIP & SKETCH – Capture, mark up, and share any part of your screen
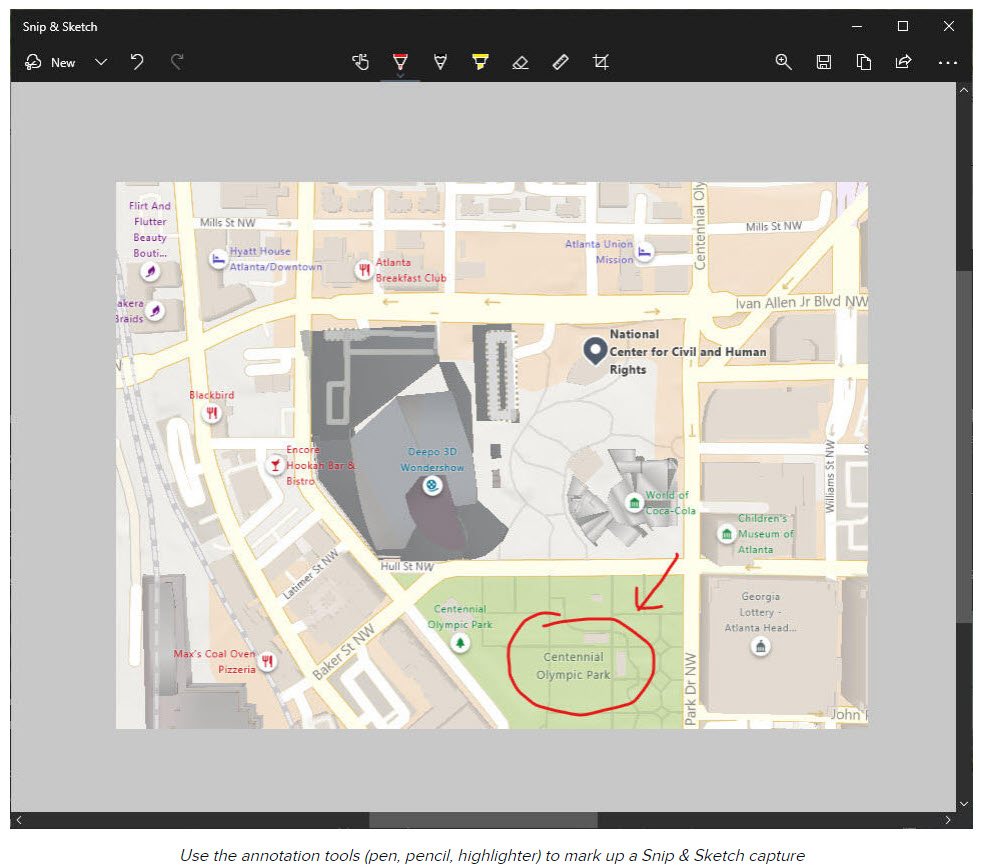
Unlike MacOS, which hides this feature under some truly obscure keyboard shortcuts, everything’s in one place in Windows 10. Press Windows key + Shift + S to shift into screenshot mode. Choose your preferred capture option (full screen, window, rectangle, or freeform) from the toolbar, and then press Enter. After you’re done, you can open the app to crop, edit, annotate, paste, print, save, or share your capture.
Even easier? Use the Snip & Sketch Settings menu to redefine PrtScrn as the hotkey that opens Snip & Sketch.
CLIPBOARD HISTORY – This essential Windows feature is no longer a one-trick pony
 Ctrl + C, Ctrl+ V. Even if you don’t know any other keyboard shortcuts, you’ve certainly memorized these two, which copy a selection to the Windows Clipboard and paste it into a target app, respectively.
For years, the Clipboard was stubbornly dumb, with the ability to remember one and only one thing.
That’s all changed, with the addition of the Clipboard History feature in version 1809. This tool keeps the most recent 25 items on the Clipboard so you can reuse a copied item even if it’s not the most recent. You can pin items to the list (boilerplate text or a logo, for example) and even sync clipboard contents between Windows devices.
To open Clipboard History, press Windows key + V. That’s a keyboard shortcut worth remembering.
BATTERY REPORT – Get the lowdown on your laptop battery

Do you know how much capacity your battery has right now? How does that current value compare to the original design specs for your laptop?
It’s astonishing to think that all of these crucial bits of information are so well hidden. Thankfully, Windows 10 allows you to get answers to both questions in an extremely readable report. The only downside is that you need to use a slightly obscure command-line option to generate the report.
- Right-click Start, click Command Prompt (Admin), and say yes to the User Account Control prompt. (If you see a PowerShell menu item where Command Prompt normally appears, open a PowerShell [Admin] session and then type cmd and press Enter.)
- At the command line, type cd %userprofile%\Documents and press Enter to change to your personal Documents folder.
- Type powercfg /batteryreport and press Enter. A status report will confirm you’ve saved the report to the current folder as an HTML file.
Now open File Explorer and double-click the saved Battery-report.html file in your Documents folder. It’s packed with detailed historical information about battery usage, including a comparison of the design capacity for your battery versus the current capacity. The Battery Life Estimates table at the bottom lets you see the range of battery life you can expect from each charge based on historical performance.
FREE ONEDRIVE STORAGE – You get 5 GB of cloud storage for no cost; use it for backup

Microsoft’s OneDrive cloud storage service is built into Windows 10. Sign in to the OneDrive client using a Microsoft account and you get 5 GB of storage for free. (If you have a Microsoft 365 account, that allocation goes up to one full terabyte.) If you don’t have a Microsoft account, you can create one for free.
What can you do with those five gigabytes? The best option, as far as we’re concerned, is to allocate that space to cloud backup. Windows 10 makes it easy to do that. When you sign in for the first time, you’re given the option to redirect three core system folders — Desktop, Documents, and Pictures — to OneDrive. Click OK, and all three of those folders are automatically copied to the cloud and synced automatically.
Connect a USB drive or removable storage and turn on File History (Settings > Update & Security > Backup) to build a comprehensive backup strategy.
TOUCHPAD SHORTCUTS – If you have a Precision Touchpad, you can do much more than point and click

Today, if a laptop doesn’t have a Precision Touchpad, it’s off my “OK to buy” list.
Fortunately, most modern Windows 10 PCs have gotten with the program. To see whether your Windows 10 laptop has a Precision Touchpad, go to Settings > Devices > Touchpad and look at the top of the page. If you see the message “Your PC has a precision touchpad,” you’re good to go.
On that same page you can see and edit all the shortcuts built into Windows 10. The default settings include three- and four-finger gestures that let you switch between apps and desktops easily. It’s worth spending some time on these shortcuts. You’ll be repaid impressively in the long run.
My favorite is the three-finger swipe, which lets you switch into and out of Task View with a swipe up or down (the same as if you press Alt+Tab). You can use a two-finger tap to right-click, and redefine gestures to suit your preferences. If you don’t use multiple desktops, for example, you might want to redefine those gestures to control your audio source and volume.
To read full article by Bott, Ed. “Five Windows 10 features you really should be using” ZDNet.com June 2, 2021