Here are your Apple computer’s best-kept secrets and how to use them.
Mac computers are so stuffed to the gills with clever and useful features, you could go years without finding them all. Your Mac has plenty of buried treasures, like a full-on emoji keyboard and a simple process to rename a bunch of files with just a few clicks. Here are seven hidden features from Apple’s computer that I can’t live without. By the time you finish reading this, I hope you’ll feel the same way.
All the emojis
Your Mac has its own emoji keyboard, just like the one on your phone. Getting to it, however, isn’t as easy as hitting a dedicated button on the keyboard.

It’s actually a series of buttons on the keyboard, but once you commit them to memory, you’ll be sending emojis from your Mac with ease.
Whenever you’re typing, press Control+Command+Space bar. A second later, the emoji picker will show up, complete with a search bar.
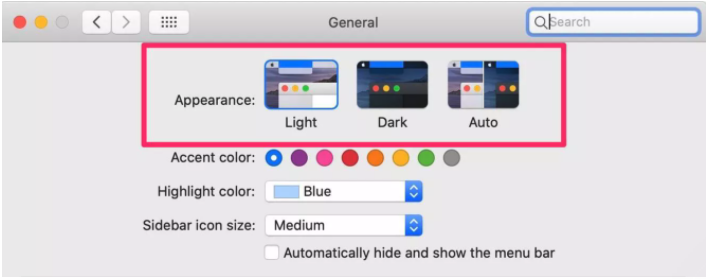
Yep, there’s a dark mode on your Mac
In fact, Apple added a dedicated dark mode to the Mac well before the iPhone ($699 at Apple) and iPad ($340 at eBay) received the same feature. Crazy, right? With Dark Mode turned on, all apps that support the feature will turn from light and bright colors to a nearly black color, making it easier on your eyes to look at the screen at night.
To use Dark Mode, open System Preferences, and click General. At the top of the Settings pane, you’ll find three options: Light, Dark or Auto. The latter two will change to dark mode, with auto using the time of day to switch between light and dark.
An always-changing wallpaper
Instead of staring at the same, boring photo as your desktop background all day long, use one of the Dynamic Desktop images.
Open System Preferences and click on Desktop & Screen Saver. Make sure the Apple drop-down is selected, and then pick from one of three dynamic desktop pictures.
The wallpaper will change throughout the day, using your location as a reference for the time of day. For example, the island photo will follow the sunrise, afternoon sun, sunset and then night, slowly changing as you work. It’s a fun twist on the otherwise static desktop images.

An easier way to take better screenshots
Taking a screenshot on the Mac can be done using a series of keyboard shortcuts, all of which start with Command-Shift and then a number. For example, CMD+Shift+3 takes a screenshot of your entire screen, and CMD+Shift+4 lets you drag a crosshair across the area you want to capture. We have a handy list of all the commands for you to learn.
But my favorite combo is CMD+Shift+5 (A relatively new shortcut command introduced in MacOS Mojave (2018). Press that on your Mac’s keyboard and a small toolbar shows up at the bottom of your screen, giving you complete control over what is and isn’t captured. You can even start or stop recording your Mac’s screen, as well as choose where the screenshot will be saved.
Using this combo takes the guesswork out of which keyboard combo you need — you only have to remember the one.
Fill out and sign documents
Instead of using a third-party app to sign a document, use the Preview app on your Mac. The ability to add a signature has been in Preview as early as 2011, but it’s not the most discoverable feature. After the initial setup (which is easy on its own) signing a document in preview takes just a couple of taps. Seriously, I use it all the time.

Open the document you want to sign in Preview, then click on the pen icon next to the search bar at the take of the window. Click on the signature box followed by Create Signature.
You can either sign a piece of paper and hold it up to your Mac’s camera, use the trackpad to sign, or sign your name on your iPhone’s screen.
After creating your signature, drag it into your document and save your work. Pretty cool, eh?
Quickly rename multiple files
Ever have a group of files you need to rename, and hate spending the time to individually name them? Open the folder that has your files, and select all of them. The easiest way to do that is to click on the first file, hold down shift, and click on the last file.
Right-click on the highlighted files, and select Rename x Files. Fill in the information you want to use, using the drop-down menus to adjust the settings, and then click Rename when you’re done.

Use your iPad as a second display
Last year, Apple introduced Sidecar, a feature that turns your iPad into a wireless second display for your Mac. Prior to Sidecar, you had to buy a third-party app or adapter in order to make it work. (MacOS Catalina installed on your Mac, and iPadOS 13 or newer installed on your iPad Pro in order to use it. )

When you’re ready to extend your Mac’s screen, click on the AirPlay icon in the menu bar at the top of your screen and select connect to your iPad. Your iPad will then display an extended desktop of your Mac that you can drag apps to, or use it however you would any other display.
Cipriani, Jason. “We Found 7 of the Best Hidden Features for Your Mac” cnet.com May 2020