 Chances are good that you’ve used Microsoft Outlook one way or another for sending an email or scheduling a meeting. But while these are the most common tasks that you can get done in Outlook, there are some tricks that you can leverage to improve your experience.
Recalling an email is one which we’ve covered before, but there is also color-coding emails or setting different time zones.
Without further ado, here are seven things you didn’t know you could do in Outlook on the desktop, and Outlook on the web.
1. Set two time zones
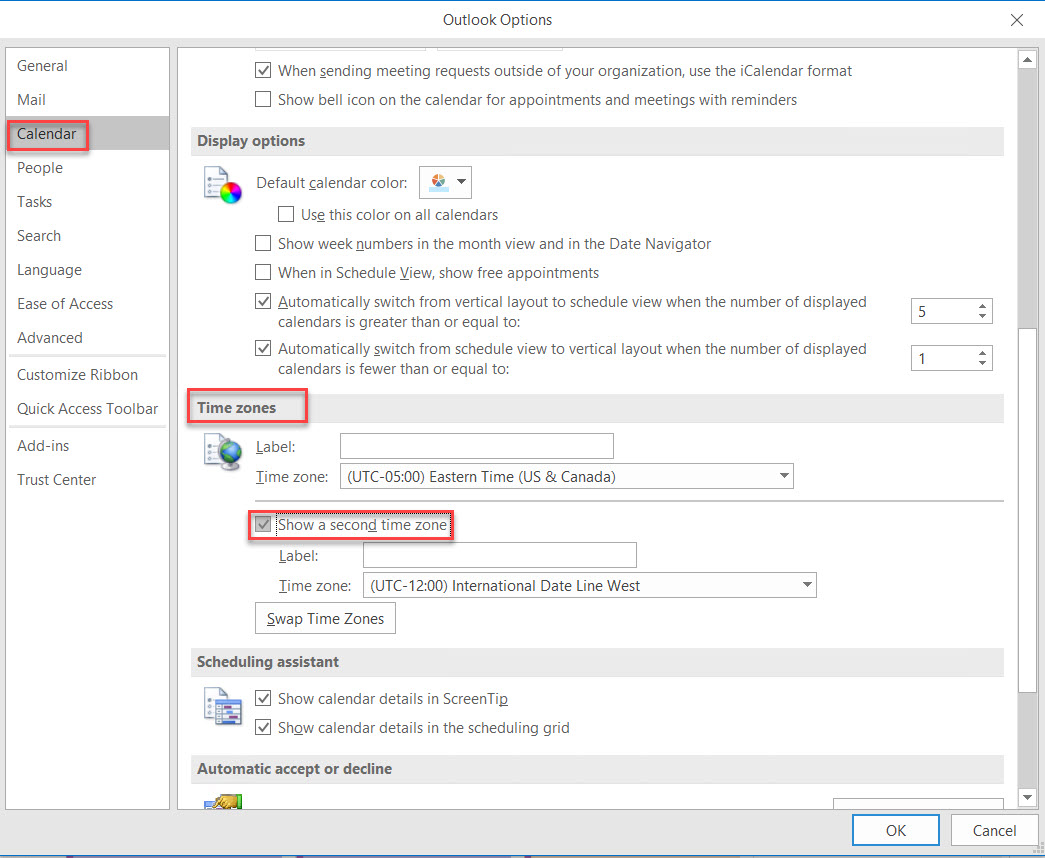
We’ll start first with time zones because time is everything! This s useful if you’re based in a different location from your job — say you’re in New York, and your job is based in Portland, Oregon. To help keep your emails on the same page, and avoid being late to meetings, you can set multiple time zones in the Outlook desktop app.
This is one of the easiest things you can configure in Outlook. All you need to do is head into your Calendar potion of the Outlook desktop app,
- Go to the File menu
- Click on Options
- Click on Calendar
- Scroll down to the Time Zones option. You should see a check box for Show a Second Time zone.
- Click the check box, and then choose your desired second or third Time Zone. You’ll now see this across Outlook.
2. Set colors for emails from certain people
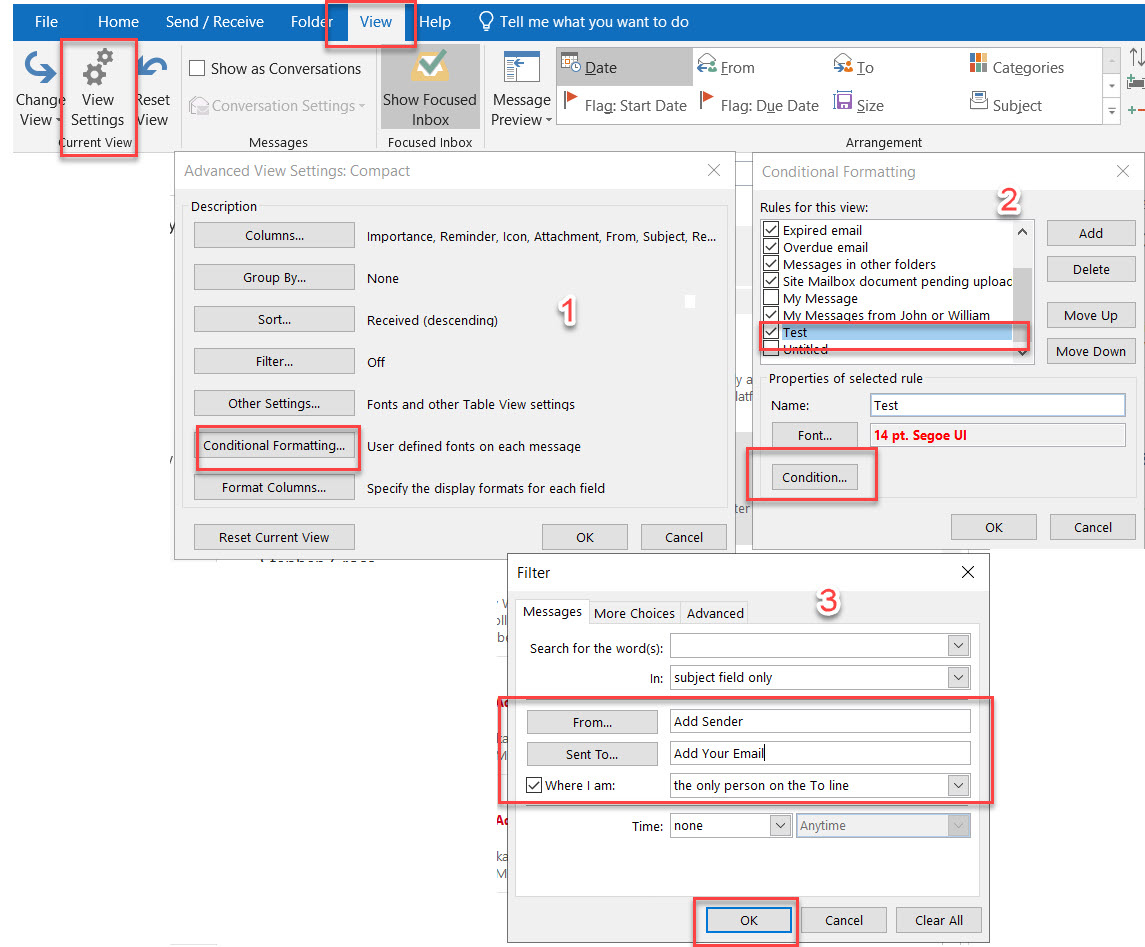
Want your emails to look a bit different so your inbox is fancier or easier to read? Outlook has your back with what’s known as conditional formatting. This feature is a way to make messages that meet your own defines conditions stand out in the message list by using color, fonts, and styles. It lands at No. 2 on our list.
You can tell Outlook to change the color of certain messages based on a sender’s name or email address; say, if you want to make all emails from your boss appear in red.
To set up a conditional formatting rule, go to your inbox:
- Click on View tab
- Select View Settings (This will give you Advanced View Settings)
- Select Conditional Formatting (For more info: Microsoft has a list of steps you can follow here)
- Select Add and enter a name for the Rule
- Select Font and Color – Click OK
- Select Condition which will bring you to Filter
- Select OK for Filter, Conditional Formatting, and Advanced View dialog boxes and done!
3. Use the Outlook hotkeys
You’re probably familiar with keyboard shortcuts like CTRL+C and CTRL+V, but did you know that the Outlook desktop app also has a set of hotkeys you can use? These keys can help you save time during your busy day, by avoiding having to drag your mouse over icons and menus to do common tasks like composing, replying, or forwarding messages. We collected our favorite Outlook hotkeys for number three on our list. Keep in mind these are for Windows 10.
Keyboard Shortcut Favorites
CTRL + Shift + M Create a new message
CTRL + R Open the reply Window
CTRL + F Opens the Forward window
CTRL+ Shift+ R Open the reply window, to reply to an entire group
CTRL+K Insert hyperlinks into emails
CTRL+ Shift+ G Flag a message
F4 Search for text in an email
CTRL+ 3 Opens the contacts list
CTRL+ 2 Opens Outlook calendar
Again, we just collected some of the most common hotkeys. Microsoft has a full list on its website, covering the Outlook shortcuts for MacOS, as well as the Web. Their list is a bit more comprehensive, covering dictation, folders, reading panes, printing, and more.
4. Start Teams meetings right from Outlook
 If you click this, you’ll be able to instantly start a Teams meeting (with work accounts) or a Skype meeting (with personal accounts.) It’s a quick way to jump through some hoops and not have to go through a lot of menus to get into a meeting right away.
5. Get to inbox zero with conversation cleanup
If your inbox is full of messages, then you might want to try the Conversation Cleanup feature in Outlook. It is yet another feature that you might not have known exists.
As Microsoft explains, the Conversation Clean Up feature in Outlook is designed to help you reduce the number of messages in your folders. Redundant messages throughout a conversation that are cleaned up are moved to the Deleted Items folder. Just keep in mind this is for conversations in an email thread or a collection of messages.
You can use conversation cleanup by going to your Outlook inbox on your desktop and then click the Home tab. From there, you can choose the Delete group and then choose Clean up.
You can choose to Clean up the Conversation to clean up the current conversation. Then, choose to Clean up Folder to clean up an entire folder, with the redundant messages being deleted. You also can opt to Clean Up Folder & Subfolders. With this option, all conversations in the selected folder and any folder that it contains are reviewed, and redundant messages are deleted.
To read full article by Bacchus, Arif. Go to: “7 things you didn’t know you could do in Outlook” digitaltrends May 18, 2021