
Microsoft Word might be the world’s most widely used writing instrument. It’s certainly far more powerful than other popular tools like pencils and pens. And it’s simple enough for beginners, but has accumulated a bigger list of features than almost any software ever written—far more than latecomers such as Google Docs. Many of these features are well-hidden, even from expert users. We’ve gathered a set of tips designed both for beginners and longtime users that will make Word more productive and more efficient than you ever imagined.
All the tips in this story should work with any version of Office that you’re likely to be using, including the versions dated 2016, 2019, and 2021. Most but not all will work in 2013 and earlier versions. If you’re a Mac user, when I suggest you right-click on something, Cmd-click on it instead. When I say to press Alt-something, press Option-something instead.
Here are our 24 tips, starting with some simple ones, and ending with more complicated ones. Even if you don’t want to use the complicated ones, they’re worth looking at to learn techniques you can use to customize Word in the ways you want.
1. Use the Search Box to Find Features
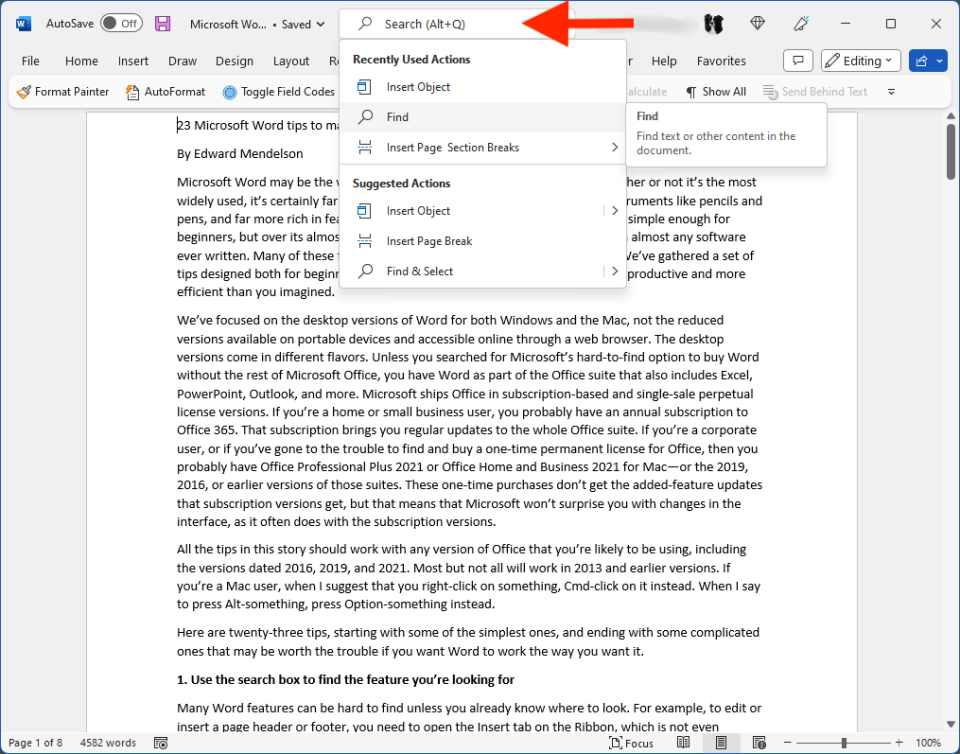
Many Word features can be hard to find unless you already know where to look. For example, to edit or insert a page header or footer, you need to open the Insert tab on the Ribbon, which is not even remotely intuitive. Instead, click on the search bar at the top of the window and type Header. Word will show a menu of header-related features and you can choose the one you want. Unfortunately, Word won’t show you where to find those features on the Ribbon, so you may need to use the search bar again.
In Windows, the keyboard shortcut that gets you to the search bar without using the mouse is Alt-Q, which you can learn by hovering over the search bar with the mouse. On a Mac, the search bar is the field in the menu bar that says “Tell me.” The only keyboard-friendly way I could find to reach it was to press Cmd-F6 until the keyboard focus moved to the menu bar, tab right until I reached the search bar, and then press the space bar.
2. Highlight a Sentence With a Click
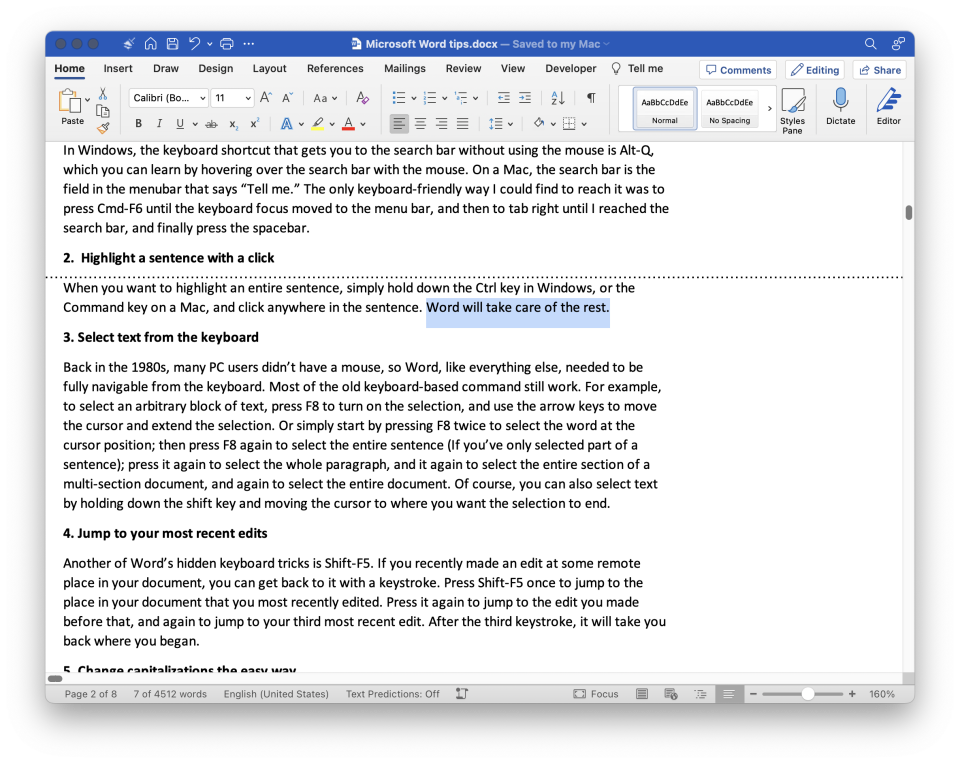
When you want to highlight an entire sentence, simply hold down the Ctrl key in Windows, or the Command key on a Mac, and click anywhere in the sentence. Word takes care of the rest.
3. Jump to Your Most Recent Edits
Another of Word’s hidden keyboard tricks is Shift-F5. If you recently made an edit at some remote place in your document, you can get back to it with a keystroke. Press Shift-F5 once to jump to the place in your document that you most recently edited. Press it again to jump to the edit you made before that, and again to jump to your third most recent edit. After the third keystroke, it takes you back to where you began.
4. Change Capitalization’s the Easy Way

Do you want to capitalize every word in a header, or reduce all-caps text to lowercase? Select the text you want to change, and press Shift-F3 repeatedly until the text looks the way you want. Each press toggles between lowercase, uppercase, “sentence case” (capitalizing the first word of a sentence), and, if you didn’t know the Caps Lock key was down and yOU tYPED tHIS, a “toggle case” option that gets it right. You can also do this from the “Aa” pull-down menu on the Home tab of the ribbon, in the Font region, but why bother when a quick keystroke or two can get it done?
5. Add Your Most Used Commands to the Quick Action Toolbar
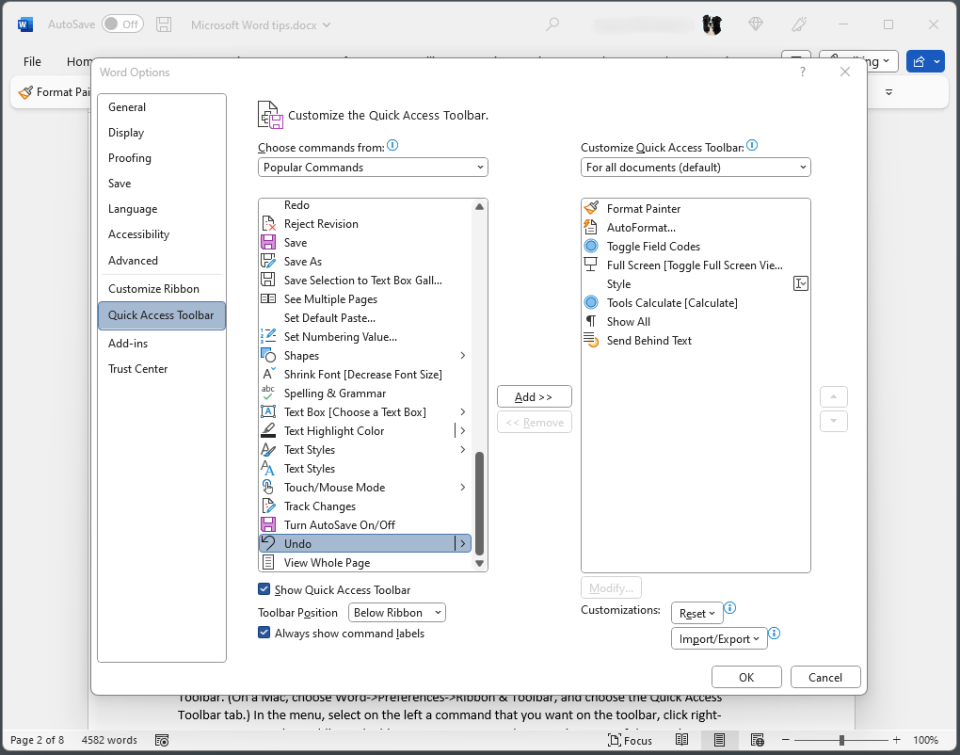
Do you waste time searching the Ribbon for commands you often use? Bring them front and center by using the Quick Action Toolbar. In Word for Windows, start by selecting File > Options > Quick Action Toolbar. (On a Mac, choose Word > Preferences > Ribbon & Toolbar, and choose the Quick Access Toolbar tab.) In the menu, select on the left a command that you want on the toolbar and click the Add button to add it to the toolbar. You may need to go to the Choose commands from… dropdown and select All Commands to find the one you want.
One advantage of the Quick Action Toolbar is that you can hide the Ribbon (in Windows, Ctrl-F1 toggles the Ribbon on and off; on a Mac, it’s Option-Cmd-R) and find commands with one click on the toolbar instead of opening the Ribbon and navigating among tabs.
I use the Quick Action Toolbar for Word’s Format Painter—the tool that copies the formatting of one paragraph so you can apply the same formatting to other paragraphs—and for much else, including a button that switches to full-screen instead of windowed mode. You can also add your own Word macros to the toolbar for instant access.
In Windows, you have the choice of placing the toolbar either above the ribbon, where it’s likely to look cramped and displays only icons, not the command names, or below the ribbon where an option lets you display both the command name and the icon of each command.
6. Show Hidden Characters
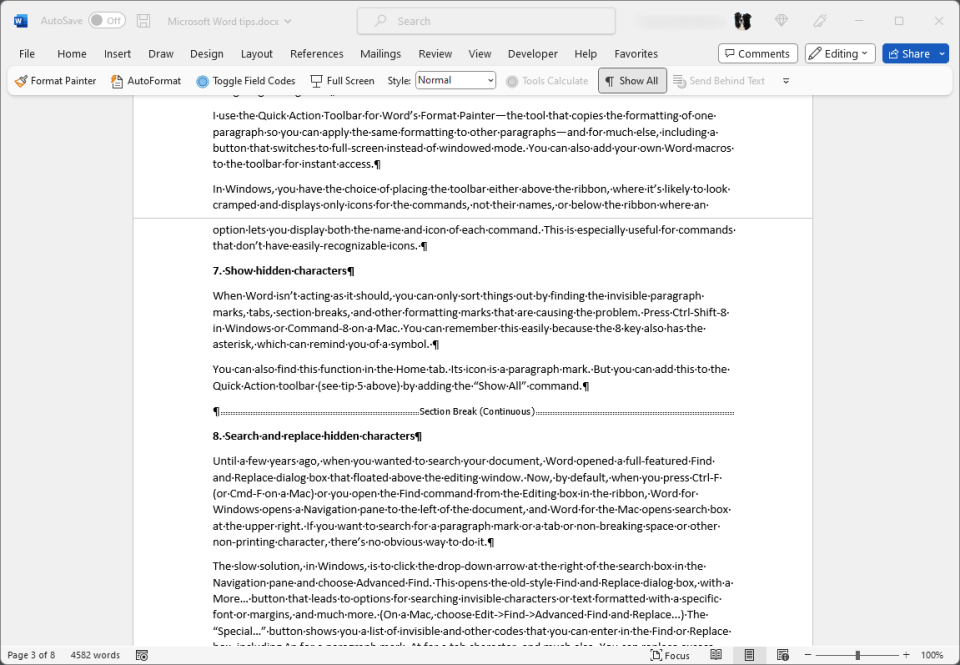
When Word isn’t acting as it should, you can only sort things out by seeing the invisible paragraph marks, tabs, section breaks, and other formatting marks that are causing the problem. Press Ctrl-Shift-8 in Windows or Command-8 on a Mac. You can remember this easily because the 8 key also has an asterisk, which can remind you of a symbol.
You can also find this function in the Home tab. Its icon is a paragraph mark. But you can add this to the Quick Action toolbar (see tip 4 above) by adding the “Show All” command.
7. Add Keyboard Shortcuts for Your Favorite commands

It’s always easier to press a key combination than to navigate a menu for what you want. I want the old-style Find and Replace dialog when I press Ctrl-F (on a Mac, Cmd-F), not the new Navigation toolbar. Here’s how I got it back. You can use the same technique to assign keyboard shortcuts for almost anything in Word.
In Windows, use File > Options > Customize Ribbon, and click the Customize… button next to Keyboard Shortcuts. On a Mac, choose Tools > Customize Keyboard. In the keyboard-customizing dialog, in the left-hand box, under Categories, scroll down to All Commands. From the right-hand list, select EditFind. Move the cursor into the Press New Shortcut Key field and type Ctrl-F. The dialog will tell you that this key is currently assigned to SmartFind, which is Word’s internal command that opens the Navigation pane. Click Assign, then Close, then OK, and you can use Ctrl-F to open the full-featured Find and Replace dialog. If you want to use the Navigation pane, you can open it from the Editing box on the Home tab in the Ribbon, or you can assign another keystroke to it, using the same technique I described here.
Notice that you can assign keystrokes that run macros by scrolling down to Macros in the left-hand list and choosing a macro from the right-hand list.
8. Add Your Signature to Your Letters
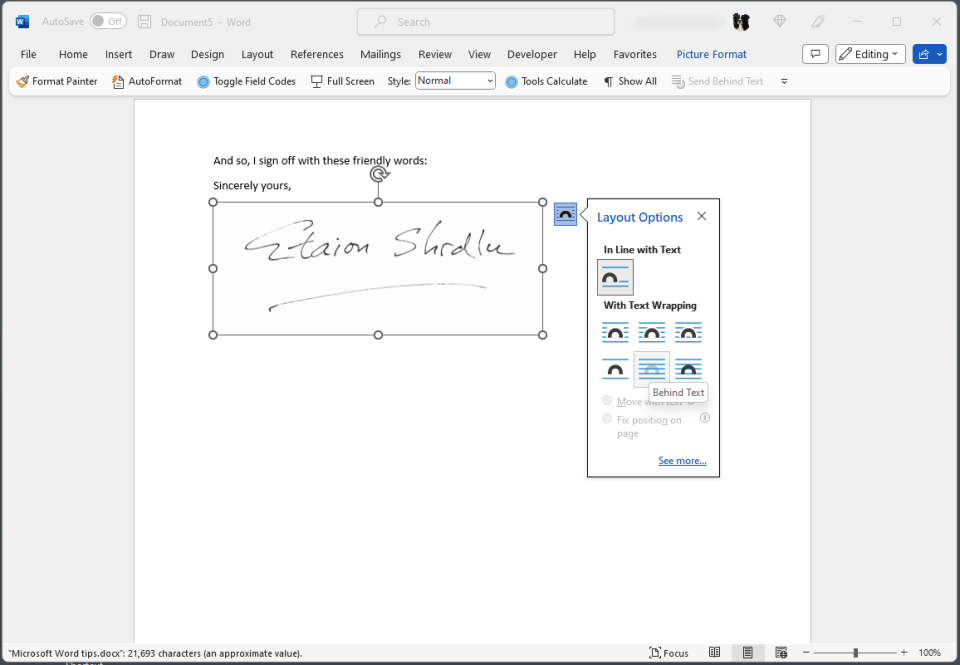
If you’re like me, you’re more likely to send letters in PDF format than on paper. You can add a personal touch to your letters by inserting a scanned image of your signature into your Word documents so that the signature will be baked into the PDF that Word exports for you to send to your correspondents. And you can automate the whole procedure.
Start by scanning an image of your signature written with a felt-tip pen on white paper. If you don’t have a scanner, your camera will get the job done, though not as easily. Use any photo editing app on your system to crop the image down so there isn’t a lot of white space around the signature. Now open a blank document in Word, and choose Insert > Picture and import the picture. Right-click on the picture and choose Format Picture. In the Format Picture pane, click on the right-hand icon (it will say Picture if you hover over it), and open the Picture Corrections menu. Here you may need to experiment. Start by changing Sharpness to 100%, Brightness to around 50%, and Contrast to around -40%. You’ll know you have it right when you see a clearly defined signature on a blank background. Drag one of the corners of the picture to scale it down to a size that will look right in your documents. Now right-click in your signature, choose Save as Picture, and save the image, preferably in PNG format, to a folder where you know you can always find it, typically your Pictures folder.
Next, write a letter, and when you get to “Sincerely yours,” press Enter, and do the following: In the Ribbon’s View tab, click Macros, then Record Macro. Give your macro a name like AddSignature and click OK. (You can ignore the Button and Keyboard options for now, or use them to add the macro to your Quick Access Toolbar or to a keystroke assignment.) Now start recording these actions: Go to the Ribbon’s Insert tab, choose Insert, Pictures, and Choose Picture from This Device. Navigate to the image that you saved earlier, and click Insert. Go to the View tab again, click Macros, and Stop Recording.
You can now perform that entire operation easily in any other document. Press Alt-F8 to bring up the Macros menu (or go to View > Macros > View Macros), select Add Signature, and press Run. If you ignored the Button and Keyboard icons in the Record Macro dialog, you can now assign a keyboard shortcut for the macro by customizing your keyboard as in tip 9 above. Choose Macros in the left-hand list of the Customize Keyboard dialog and your AddSignature macro from the right-hand list. Or, similarly, you can create a Quick Action Toolbar button for the macro, as in tip 5 above.
There’s one possible complication. You may want to type some text that overlaps your signature, and the text won’t appear if the signature image is formatted in Word’s default setting, “In Line with Text” (this option appears in the Layout Options menu that you can open by clicking the icon that appears to the upper-right of a selected picture). You want the signature to appear behind the text, but you probably don’t want to go through a lot of menus to format the picture “Behind Text.” You can’t record this option as part of your AddSignature macro, but you can add a command to the Quick Action Toolbar; under All Commands, find Send Behind Text, and add it to the toolbar. Now, If your image is hiding some text, just click on the image and on the “Send Behind Text” button on the toolbar to make things right.
9. Customize the Status Bar
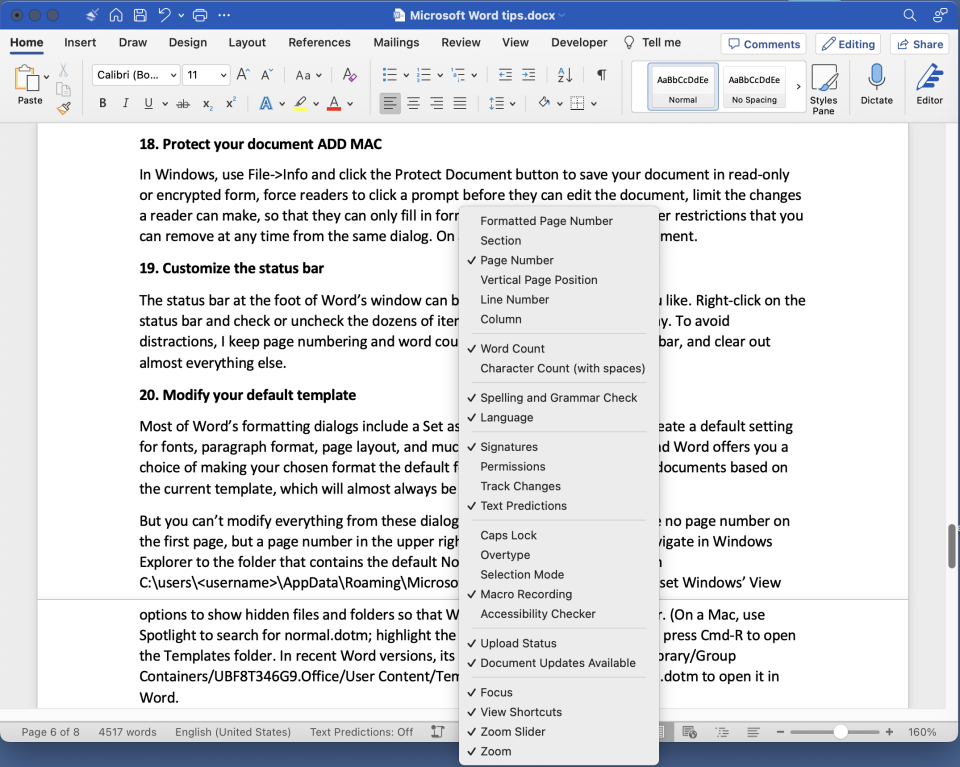
The status bar at the foot of Word’s window can be as clean or as cluttered as you like. Right-click on the status bar and check or uncheck the dozens of items that the status bar can display. To avoid distractions, I keep page numbering and word count on the left side of the status bar, and clear out almost everything else.
Get advanced email protection from infected attachments, suspicious links, phishing attempts, and email-based malware. Our newest service will harden your email system and put your organization in the best position to prevent potential threats. For more information contact us at [email protected] or give us a call at 732.780.8615.
Excerpt taken from Edward Mendelson, “24 Microsoft Word Tips to Make Your Life Easier”, pcmag.com, June 8, 2023