 Save time and handle email more efficiently with these next-level Gmail tips.
You might not know it from looking, but Gmail is jam-packed with time-saving tricks.
Some of ’em are right there in front of your face, if you know how to find ’em — while others require a teensy bit of under-the-hood tinkering to activate. But all of ’em are built right into Gmail and have the potential to make managing your email a heck of a lot easier.
Check out these 17 splendid Gmail tips and get ready to master your inbox once and for all.
(Note that unless otherwise specified, these tips are specific to Gmail’s web-based desktop version.)
Gmail tips: Inbox step-savers
1. You can actually view attachments right from your Gmail inbox. Provided you haven’t switched away from the service’s “default” interface arrangement, you’ll see small tiles for every file associated with an email right below the message’s subject line. And you can click on any of those tiles to open or preview the file’s contents and get directly to the info you need.
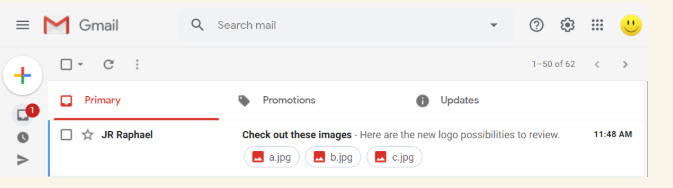
Gmail’s attachment tiles are a great way to jump directly to attachments without having to open an email.
2. It’s easy to miss, but take note: When you hover your mouse over a message in your inbox, Gmail gives you a series of quick-access actions at the far-right side of the line. You can archive the email, delete it, mark it as read or unread, snooze it, or even RSVP to a meeting request right then and there — without ever having to open the message.
3. A super-useful keyboard shortcut I always forget to use: While viewing a multi-email thread of messages — a conversation in which you have numerous back-and-forth replies under the same subject — hit the semicolon key (;) to expand the entire conversation and show every message in the thread. And then hit the colon key (:) to collapse it back down so you see only the most recent email.
Just make sure you enable keyboard shortcuts first, if you haven’t already: Click the gear icon in the website’s upper-right corner, then click “See all settings” and look for the “Keyboard shortcuts” option midway down the screen that comes up. Select the “Keyboard shortcuts on” setting and then be sure to click the Save Changes button at the bottom of the screen.
4. Some of Gmail’s best keyboard shortcuts are the ones you create yourself. Go back into the website’s settings and this time, click the Advanced tab. See the line labeled “Custom keyboard shortcuts”? Click “Enable” next to that, then click the Save Changes button at the bottom of the screen.
Once Gmail refreshes itself to apply the changes, go back to the Settings area again and look for the newly present Keyboard Shortcuts tab. There, you can adjust any of the default keyboard settings to make them simpler to activate or easier to remember.
One of my favorite adjustments, for instance — and one I rely on constantly — is adding in a second command for the “Go to inbox” shortcut, which is typically gi by default. In Google’s old Inbox service, that shortcut was simplified down to just i, and once you get used to that shorter sequence, you won’t want to go back.
5. The panel at the right of Gmail’s web interface lets you pull up Google Calendar, Google Keep, or Google Tasks right inside your inbox so you can manage info from each of those apps without having to switch tabs or open anything new — and here’s a handy hidden trick: With Tasks, you can drag messages directly from your inbox into the panel to create new tasks around them.
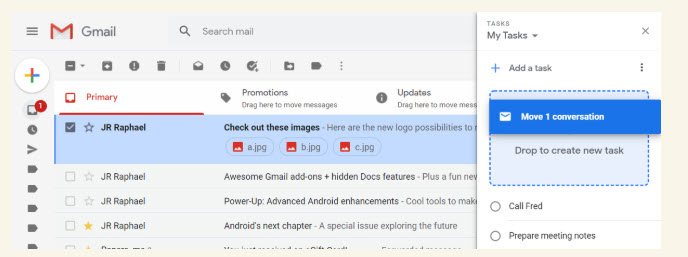
Creating new tasks from emails is as simple as dragging and dropping, as is being done here with the topmost message. Unfortunately — and somewhat strangely — the same drag-and-drop behavior isn’t currently possible with Calendar or Keep.
6. Another glaring omission in that side-panel area is the lack of any panel-based presence for Google Contacts, which seems like an obvious element for on-screen access. If you have Gmail keyboard shortcuts enabled, though, commit this workaround to memory: Pressing g and then c will open up Contacts in a separate tab. It’s not entirely optimal, but hey — it’s something.
Gmail tips: Composing shortcuts
Editor’s note: Assuming you’ve enabled keyboard shortcuts (see tip 3), the following keyboard shortcuts work in any browser on any desktop operating system. Mac users, just swap in the ⌘ key for “Ctrl” wherever you see it.
7. Ever like marking messages as unread after you’ve opened ’em? Gmail makes that incredibly easy to do: Anytime you have an email open, look for the envelope icon directly to the right of the trash can in the horizontal row of icons above your message (in the area directly beneath the search bar). That’ll let you mark the message as unread with a single click. Or, for a faster and more powerful one-two punch, just type an underscore (_) while viewing any message. That’ll mark it as unread and zap you back to your main inbox.
8. Speaking of combining multiple actions into a single command, simplify your inbox organization process by enabling Gmail’s convenient Send & Archive button. It places a second button alongside the regular Send button whenever you’re responding to an existing message, and clicking that button (or, even better yet, hitting Ctrl-Enter on your keyboard) will send your response and archive the thread in one fell swoop.
To enable it, look for the “Send and Archive” option within the General tab of Gmail’s settings. Click “Show ‘Send & Archive’ button in reply,” hit the Save Changes button at the bottom of the screen, and then get ready to save yourself steps the next time you type a reply.
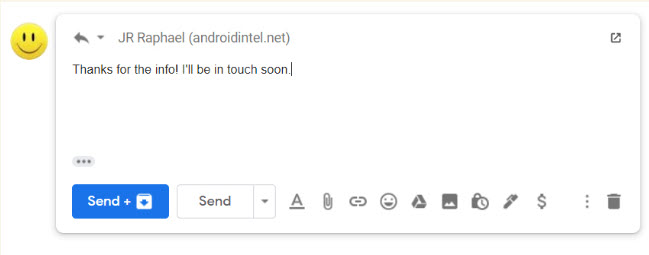
Gmail’s Send & Archive button (the blue one to the left of the regular Send button) turns two steps into one.
9. I don’t know about you, but I frequently start typing an email and then decide against sending it. (Rather fittingly, I started typing out a lengthy explanation of the reasons but then decided against including it.) If the same thing ever happens to you, remember this: Hitting Ctrl-Shift-D while you’re in the Gmail compose tool will close the compose window and discard your draft. And it works whether you’re writing a new email or a reply.
10. Another awesome time-saver: In addition to the obvious Ctrl-B for bold and Ctrl-I for italics email formatting shortcuts, Gmail has hotkeys for doing some advanced forms of text formatting — things that’d otherwise require multiple clicks and much menu-hunting to accomplish.
The ones I use the most:
- Ctrl-Shift-8 will add a bulleted list into your email (just like this list!), and Ctrl-Shift-7 will add a numbered one.
- Ctrl-Shift-9 will offset text in a blockquote style.
- Ctrl-] will indent text, while Ctrl-[ will remove any indentation.
- And Ctrl-\ will remove any formatting on your selected text and make it as plain as can be.
11. You’d never know it, but the Gmail compose tool itself can take on various forms, depending on your preferences. Make a mental note of these possibilities and the shortcuts to get to ’em:
- To start a new message in the default lower-right-corner-of-the-screen window view, hit c.
- To start a new message in a pop-up window totally separate from your main Gmail tab, hit Shift-C. You can do the same thing for a reply by hitting Shift-R while viewing a message thread — or Shift-A for reply-all.
- To start a new message in a full-screen compose window within your main Gmail tab, hit c — then click the little arrow icon in the compose tool’s upper-right corner. (You can also hit Shift while clicking that icon to pop the message out into a separate pop-up window form.)
- If you’d rather use that full-screen compose window all the time, by default, click the three-dot menu icon in the lower-right corner of the compose tool and look for the “Default to full-screen” option there. (If you ever change your mind, you’ll find the option to disable that preference in that very same spot.)
- If for some reason you like the idea of composing a message in a new tab instead of a pop-up window or within the main Gmail tab, just hit d while in your inbox. That’ll do the trick!
To see more keyboard shortcuts, just type ? while viewing any message list within Gmail.
Gmail tips: Smarter snoozing
12. Don’t forget to take advantage of Gmail’s super-handy snoozing tool: Instead of letting messages linger in your inbox and pile up to an unmanageable point, use the snooze function to help yourself deal with everything as soon as you see it.
A good rule of thumb to maintain: If you can respond to something in less than a minute, do it. If something doesn’t require any action on your behalf, archive it immediately. And if something requires some sort of action but you don’t have the time to mess with it at that moment, snooze it to a day and time when you will be able to handle it.
You can snooze an email from your inbox by hovering over the message and selecting the clock-shaped Snooze icon, as noted in tip 2. You can also snooze an email while it’s open by clicking the Snooze icon to the right of the envelope icon in the row at the top of the page. Or you can simply press b while you’re viewing a message or while you have it selected in your inbox. From the menu that pops up, select a preset time or specify a date and time of your choosing.
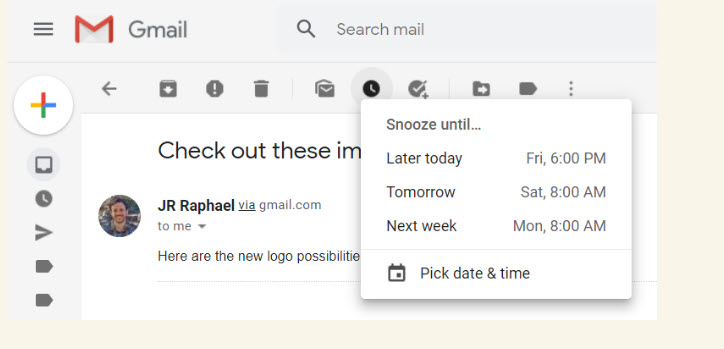
Snoozing a message causes it to vanish from your inbox and then reappear at any day and time you choose.
13. Gmail even makes it possible to snooze multiple messages at the same time — in case you see more than one email that needs to be pushed back to the same point. From your inbox, simply click the boxes to the left of any messages you want to include, then click the clock-shaped icon in the horizontal row of icons that appears at the top of the screen and select the day and time you want.
14. Need to get back to something you snoozed — or change the day and time at which it’s set to reappear? You can always find all of your snoozed emails in Gmail’s Snoozed section, located beneath the “Inbox” line in the left-hand panel. Once you’re there, just hover over any email and click the clock-shaped icon to change its snooze settings or unsnooze it entirely.
15. You can snooze messages from the Gmail mobile apps, too, though the option is a bit buried. From the inbox view, press and hold a message to select it, then tap the three-dot menu icon at the top of the screen and look for “Snooze” in the list of options that appears. If you’ve already opened the message, tap the three-dot menu icon at the top of that screen; you should see “Snooze” show up as part of the options there as well.
16. Make snoozing even simpler in the Gmail mobile app by assigning it to one of your inbox swipe actions. Just open up the app, tap the three-line menu icon in its upper-left corner, then select “Settings.” On Android, tap “General settings” followed by “Swipe actions”; on iOS, the “Swipe actions” option will be on the first screen you see.
All that’s left is to set either your left swipe or right swipe to “Snooze,” and then, you can simply swipe any message in that direction from your inbox to snooze it — no wasted taps or menu diving required. (The Gmail Android app has several other similarly useful hidden features, by the way, most of which aren’t available on iOS.)
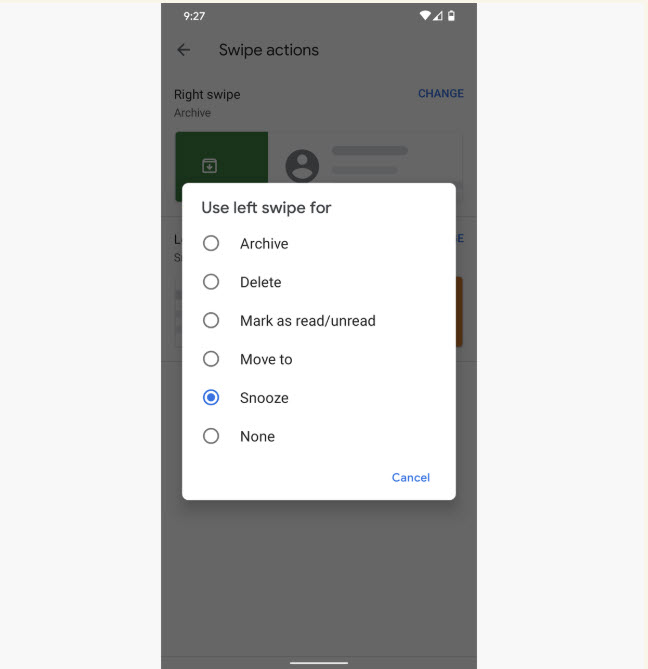
With one quick setting adjustment, you can snooze any message from the Gmail mobile app simply by swiping it to the left or the right from your inbox.
17. In addition to being able to select your own custom date and time for snoozing, you can actually customize what default times Gmail uses for its preset “Morning,” “Afternoon,” and “Evening” snoozing options — though no normal person would ever realize that, as the associated setting isn’t even within Gmail itself; it’s within Google Keep. (Perfectly sensible, right?)
So here’s the secret: Open up Keep, click the gear icon in its upper-right corner, and then click “Settings.” (If you’re using the Keep mobile app instead of the website, tap the three-line menu icon in the app’s upper-left corner and then select “Settings” there.) Look for the “Morning,” “Afternoon,” and “Evening” options beneath the Reminder Defaults header, enter in whatever times you want for each day part, and then click “Save” (or simply back out of the settings area, in the mobile app).
Refresh your Gmail tab, and there you have it: The times you selected in Keep will now be used for the same respective day parts there and in the Gmail mobile app as well. Yay, Google logic!
This story was originally published in May 2018 and updated in July 2020. by JR Rahpael “Gmail tips: Snoozing, shortcuts,and other time-savers” Computerworld.com